The Belle Dress: A Tutorial from crafthours

Ha, totally fooled you guys! I know you thought we were going to do a Sleeping Beauty dress after the success of Snow White, but we're dealing with the whims of a 3 year old here. So, Belle it is.
Again, I used knit fabric to make this a super comfy dress-up dress, and a peasant dress pattern to make costume changes easier and eliminate the need for zippers or buttons.
You will need:
Your trusty peasant dress pattern and directions
2 yards of yellow lightweight knit fabric
1 yard of a sheer yellow or white fabric with lots of drape (nothing stiff like tulle)
lots of 1/4 inch elastic. lots.
Step 1: Cut out your peasant dress pieces. The pieces below are still folded in half, and obviously you will need 2 sleeves. As you can see, I cropped the sleeve so it would just be a slight cap sleeve. The bodice pieces should be cut just past the natural waist. The front bodice piece (pictured on the left) has a lower neckline and a pointed center.

Step 2: For the skirt, you'll need to cut a lot of rectangles. Use at least 8. The more you use, the fuller your skirt will be. The length of the rectangle will be the length from the natural waist to the ankle plus 6 inches. I used a width of 7 inches and I thought it worked pretty well.

Step 3: Cut all of your rectangles so they are tapered on the sides by about 2 inches and round out the bigger end, which will become your hem.

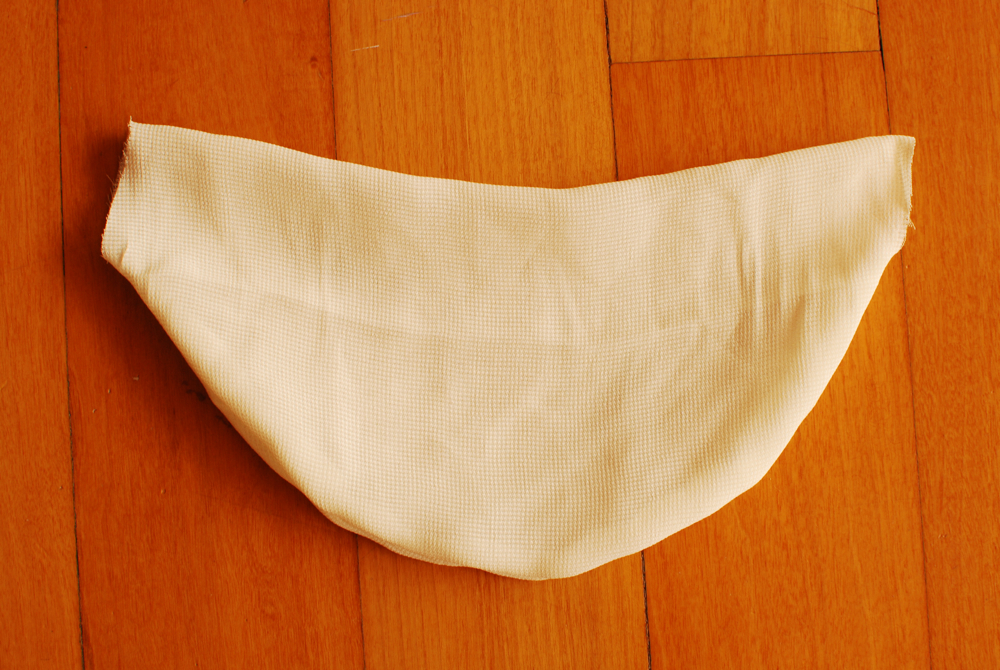
Step 4: Estimate on your skirt panels where you want the swags to sit. Mine are about 11 inches down. Measure across the skirt panel at that point. Cut rectangles from your sheer fabric with a width of your skirt panel width plus 1 inch. The length of the rectangle should be about 12 inches. Fold your rectangle down (so your 12 inch side is now 6 inches). Cut the bottom edges so they make a crescent. That was painful. Just look at the picture:

Step 5: With right sides together, sew the crescent closed and flip it right side out. Press.
Step 6: Pin each crescent to each skirt panel at the same height, making sure to scrunch up the swag on the sides. Since your swag is slightly wider than the panel, it should gape a little bit in the middle as well.

Step 7: Sew all the panels together, catching the edges of the swags as you go.

Step 8: Sew your bodice and sleeves together using normal peasant top construction directions.

Step 9: Gather the top of the skirt to match the bottom of the bodice and sew them together.

Step 10: Finish the sleeves and neckline with elastic per peasant top directions.
Step 11: Cut 1/4 inch elastic to the length of the skirt panels minus 6 inches. Pin the elastic to the waist seam on top of one of the skirt panel seams.

Step 12: Pin the other end of the elastic to the hem, again right over the skirt panel seam.

Step 13: Stretching the elastic taut, sew down the elastic, directly over the seam. Once you've done that for each of the skirt panel seams, it'll bunch up and start really looking Belle-ish.

Step 14: Using the same sheer fabric as you did for the swags, form a circular tube of fabric. First take a rectangle that is 5 inches x the measurement around the upper shoulders plus a couple inches. Sew the rectangle right sides together down the long side so you have a long tube. Flip the tube right side out. Fold the edges of one end to the wrong side and press. Put the edges of the other side into that side and topstitch down, forming a circular tube.

Step 15: Tack one side of that tube down at the neckline of your dress, centered on the shoulder. Find the opposite side of your tube and do the same thing on the other side.

Step 16: At the front and back, scrunch the tube up and sew down directly at the center of the bodice.

Step 17 (optional): I made a little rose by rolling up a tube of knit fabric and hand sewing it to the center front bodice.
Now you're finally done! End the constant "is it done yet, is it done yet, is it done yet?" mantra from your kid.


No comments:
Post a Comment